As a small business owner, the thought of setting up a bookkeeping or accounting system can seem daunting. However, good financial data is vital to your business success, and setting up a bookkeeping system can actually be quite simple.
There are many online accounting programs available today. QuickBooks is my favorite. QuickBooks is perfect for the very small businesses all the way up to the very large and sophisticated businesses. It’s easy to use, but it can grow with you as your business expands. Let me show you how easy it is to get started with QuickBooks. (This post does contain affiliate links for products I use and highly recommend.)
Get Started with QuickBooks
I recommend beginning with the Simple Start version of QuickBooks online. It has all of the main features you will need to easily keep your small business bookkeeping records. If your business grows, and you need additional features, you can always upgrade to a higher level QuickBooks program. When you upgrade, all of your old data comes with you, you don’t lose a thing. I do not recommend using QuickBooks Self-Employed. It’s missing some important features and saves you very little in monthly fees.
You will have a much simpler time completing your small business bookkeeping if you have followed my advice to keep your business financial transactions separate from your personal. Find information on that topic here.
#1 Connect your Financial Accounts
Once you have signed up for QuickBooks Simple Start the first thing to do is to connect your business bank accounts and credit cards. Once connected, all transactions going forward will immediately be imported, saving you lots of time manually inputting information. You can also import past transactions from up to 90 days ago.
It really helps to choose a solid start date for your bookkeeping, before you begin importing transactions from your bank accounts and credit cards. Watch this video for insight on selecting the right bookkeeping start date for your needs.
From the QuickBooks online Dashboard, select the Business Overview tab along on the top. On the right-hand side, click the button, Connect Account, shown below with the big pink arrow!

![]()
![]()
![]()
![]()
Once you click the button, it will bring up this screen for linking to your financial account. Simply type in the name of your bank or credit card company. You will follow prompts to enter your login information. If given the chance to import data from the past, go as far back as you need.

Do this same process for all of your business bank accounts; including checking accounts, credit cards, or PayPal accounts. If you need a little more visual help on this process, watch this video on how to connect a new financial account to QuickBooks Online.
QuickBooks will begin to import transactions from these accounts.
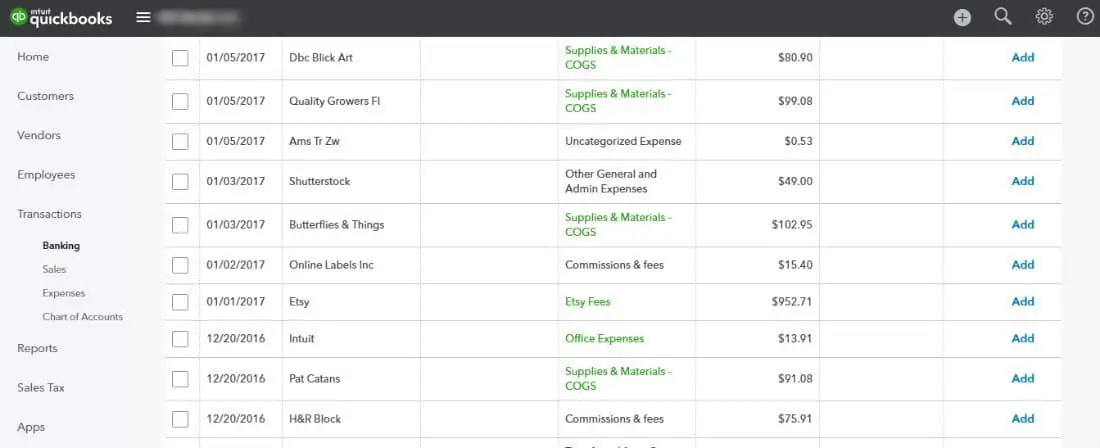
Once the data is imported, from the Banking page, click on one of your financial accounts. It will bring up that accounts bank feed and should look something like this.![]()

In accounting, each transaction has two sides, this is called Double Entry Accounting. We already know the one side, it’s the bank or credit card account that the transaction occurred in. Now we have to assign an account to the other side of the transaction, in most cases, a revenue or an expense account. In accounting speak, we call this coding.
#2 Create Custom Account Names
QuickBooks comes with pre-created revenue and expense accounts you can use, or you can create your own. All of these accounts comprise your Chart of Accounts. When you categorize transactions to various accounts, those categorized values and account names will then be used to create your financial statements. More on those later!
In QuickBooks accounts are also called categories, so I will use the terms interchangeably. Each account has a type, for example, Expense or Revenue. It may be tempting to always use the account names that QuickBooks gives you, but I would encourage you to use your own where appropriate. The point of bookkeeping is to have financial data that helps you make decisions for your company. The financial data should make sense to you, and be presented in a way that helps you in your decision-making process.
If you have several distinct areas of your business, you will want to see that broken out in your financial statements. For example, you could create expense accounts called Etsy – graphic design and Blog – graphic design for graphic design expenses, rather than lumping all such expenses under one QuickBooks provided account such as Office Expenses. Don’t go too crazy, but create accounts that make sense to you. In the same way, instead of lumping all revenue in one account, you could separate your revenue by type Etsy Sales, Blog Affiliate, Blog Advertising, etc. Structure and name your accounts in a way that makes sense to you.
You can create your own name for accounts in one of two ways. Later in this post, I will show you how to add your own account names as you go along. If you want to set up a bunch of your own account names from the beginning you do that in your Chart of Accounts. You can find your Chart of Accounts by clicking on the gear icon in the top right corner. ![]() This post on chart of accounts shows you exactly what to do.
This post on chart of accounts shows you exactly what to do.![]()

Need help setting up your chart of accounts in QuickBooks? I’ve created video tutorials and a customized Chart of Accounts you can upload for Etsy, Shopify, and Amazon.
Click HERE to watch the instructions and download the Chart of Accounts for Etsy.
Click HERE to watch the instructions and download the Chart of Accounts for Shopify.
Click HERE to watch the instructions and download the Chart of Accounts for Amazon.
#3 Coding your Transactions
The great thing about QuickBooks is that it can learn from your coding, and remember where to code future transactions for you based upon the vendor. In the list of transactions pictured two screenshots above, you will notice some accounts in green. These are accounts that QuickBooks has remembered from the last time I coded a vendor expense there. If that account still makes sense, I can click the Add button on the right, and that transaction will be done. It has been properly coded and you will see it disappear from this screen. This screen is basically the holding area for transactions that still need to be coded.
Some of the accounts show a gray account name. This is the QuickBooks suggested account, but it is not a remembered transaction. This may be the first occurrence of this vendor, and QuickBooks makes a guess as to where it should go. If you like their account, you can click add and be done.
Chances are, at least at first, you won’t like their account. So click on the transaction to edit the account it is coded to. In our example, the purchase from Online Labels is being coded by QuickBooks to Commissions and Fees. This is not what we want.

Our first option is to use the drop-down menu to give us all the choice in our chart of accounts. In our example, Shipping Supplies is the appropriate account to code this transaction to. Shipping Supplies is an account already created, so we simply find it in the list, select it, and hit the Add button.

If you don’t like any of your account choices in the drop-down list, you can name your own account. Start typing what you want the account to be. Remember, account names should help you. Just start typing the account name you would like to use in the box.![]()
![]()
![]() This is how we can add account names as we go along. I typed Etsy-Shipping Supplies.
This is how we can add account names as we go along. I typed Etsy-Shipping Supplies.
And then hit the plus sign to create that account. After you hit the plus sign, you will be brought to a screen like this.

If you are creating a new Expense account, make sure the Category Type your choose is Expense. Don’t waste a lot of time wondering about what to choose for the Detail Type, just select the type that seems to make the most sense to you. Make sure the new account name you typed in is what you want. Once you’re done, hit Save and Close. You have just created a new account!
Once you have the right account selected, either from the list or creating your own, don’t forget to choose or add a Vendor name. Adding a Vendor name is very important as it makes finding and editing transactions at a later time very easy. Once you have the right vendor name and account selected, simply click ADD. Now that transaction has been coded and is done.
Go through all of your transactions until everything has been coded. Go through the same process for all of your financial accounts until you are all done.
In our example, we coded an expense. Coding revenue accounts is exactly the same. Notice that there are two columns of dollar values in each register. The left is for money spent (expense), the right is for money received (income). Code your income in the right-hand column just as you would your expenses, but choose income accounts from your chart of accounts.
As you code each transaction you are creating financial reports of your records. You can look at your financial reports by going to Reports in the left menu. The most common financial reports to use and view are the Balance Sheet and the Profit & Loss Report. Who knew creating financial reports could be so easy!
The sooner you set up your small business bookkeeping system the better! Cross this item off your list now! Get started with QuickBooks, it will make your business life much easier!
Need a little more bookkeeping help? Check out my tutorial videos on YouTube. I also offer monthly bookkeeping services for Etsy sellers.


