In the Quick Start Guide to QuickBooks post, we talked a little about naming your revenue and expense accounts. The list of all your account names is called your Chart of Accounts.
The Importance of your Chart of Accounts
As a new small business owner, you may be tempted to just use the account names and chart of accounts already provided to you in QuickBooks. However, with just a tiny bit of thought and effort, you can create your own chart of accounts that will provide financial information to you that is actually meaningful. After all, the point of bookkeeping is to provide financial records that are useful, meaningful, and aid in decision making! (This post does contain affiliate links for products I use and recommend.)
How I Customized
To illustrate my point I thought I would show you my chart of accounts. This is how my accounts look when I run a Profit & Loss report. Now I’m not going to show you my numbers, because I feel too weird doing that, but I am going to show you my list of account names, my chart of accounts.
I have several very different areas to my business. I sell a few things on Amazon, I write eBooks, I run this website, and I have an Etsy shop. Ultimately it is important to me to make each area of my business profitable.
It is usually not possible for a new area of business to be profitable on day one. At first, profitable areas of a business cover for the unprofitable areas to get them off the ground. However, within a year or two of starting a new side hustle/area of my business, I want that area to be able to stand on its own two feet. I want eBook sales to cover editing costs. I want affiliate income to cover website expenses etc. It takes time, but that’s the goal.
The easiest way for me to gauge how each area of my business is doing is to make each area easy to spot on my chart of accounts. I want my chart of accounts to work for me! Now QuickBooks does have a really nice way to do this with their higher level paid products, it’s called “Classes”. With classes, you simply tag which class an expense or revenue belongs to (in my case Amazon, eBooks, Website, or Etsy) and you can run reports separating your financial data by class. It’s really nice! But right now I’m on a budget and want to cut costs, so I accomplish the same thing, with their much cheaper Simple Start program. To do that, each area of my business has it’s own revenue heading and expense heading, with sub-accounts under each.
My Chart of Accounts
Here is the revenue and cost of goods sold portion of my chart of accounts:

Here is the expense portion of my chart of accounts:
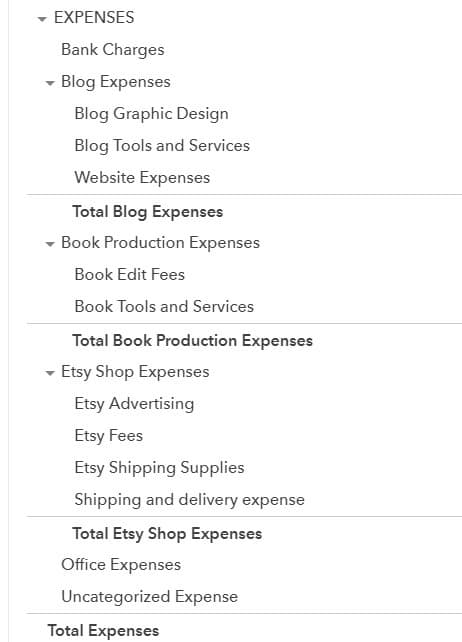
If you already have QuickBooks you may notice that almost zero of my account names come straight from the pre-loaded QuickBooks account names. By customizing my chart of accounts, when I run a Profit & Loss report, I can quickly gain a picture of my business health. How much did I spend on the website this year? What did it cost me to produce my eBooks? What was the net profit or loss on eBooks this year? In a mere moment, I have the answers I need. If I had just lumped all revenue into a generic sales account and all expenses into generic accounts like Other General & Administrative, I would have no easy answers to my questions.
There are a few accounts that truly do apply to all areas of my business such as Office Expenses, so those are left as stand-alone accounts. I include the cost of QuickBooks and printer ink for example in Office Expenses. The benefit of QuickBooks applies to all areas of my business!
When the information is easy to read and right in front of you, you can adjust your business plans accordingly and make smart financial decisions. Did it surprise you how much you spent on ads? Are your production costs higher than you thought when all added together?
How long did this take? About half an hour while I watched Henry Danger with my kids! Worth it? Yes!
How to Customize your Chart of Accounts
To customize your Chart of Accounts, go to the gear icon in the upper right corner of your QuickBooks screen and click Chart of Accounts. Simply add new accounts, delete ones you don’t need, or edit names of existing accounts.
When adding or editing accounts you can click the Sub-Account check box to make that account name the sub-account of another account. For instance, I created an Etsy Sales revenue account that I don’t use, it is basically a revenue account title placeholder. I created the account Etsy Income, made it a sub-account of Etsy Sales, and I record all Etsy Income to the Etsy Income account, which falls under the Etsy Sales umbrella. Neat and tidy!
Watch the video to quickly see how it is done:
My chart of accounts was created in QuickBooks. If you don’t use QuickBooks you may be able to accomplish the same thing in your own program of choice. Many programs allow you to create your own accounts, some do not. Word of warning, if your program will not allow you to create your own accounts, I would personally view that as flashing red lights telling me it may be time to upgrade to an accounting tool that will actually make my life easier! Just saying.
Now go make that financial data be useful to you!